This premium tutorial is for
Manga University students
How to Draw Tsunami (from Tenchi Muyo)
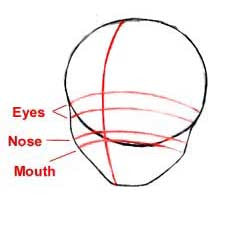
In this tutorial, I will show you how to draw Tsunami from "Tenchi Muyo." Begin by drawing a large circle, and divide it up with guidelines as shown. Be sure to draw the guidelines very lightly, because you want to be able to erase them when you are done. In this particular picture, Tsunami is looking up, so her face is going to be drawn from a slightly different angle than if you were drawing a standard 3/4 view. When drawing the lower half of the face, try to make the lines on her cheeks and chin very smooth and rounded, rather than making them sharp and pointed. At this angle, her chin is going to be very wide and flat.
