This premium tutorial is for
Manga University students
How to Draw Trunks (from Dragon Ball Z)
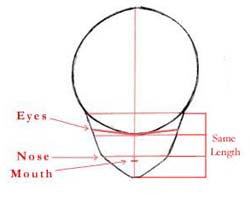
From what I have seen, most Dragon Ball Z characters can be drawn using these basic shapes and proportions. Dragon Ball Z characters all have similarly constructed faces: they have large foreheads, slanted, triangular eyes, and small lower faces. Once you see how the basic face is proportioned, you should be able to draw whichever character you like. Begin by drawing a large, slightly elongated circle for the forehead. Draw the lower half of the face and divide it up with lightly drawn guidlines as shown. Notice that the lower half of his face can be divided up into equal sections; the main horizontal guidelines are equidistant from each other. Draw the slanted guidelines for the eyes, and sketch the position of the mouth (which should be directly below the guideline for ...