|
|
Front
View
Step
1:
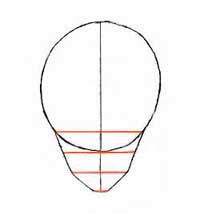
We'll begin
with sketching the basic shape of
the face. Draw a large, slightly
elongated circle as shown. When
drawing the lower half of his
face, notice that the lines drawn
in red are about the same
distance from each other. It is
important to place the guidelines
correctly, because they'll come
in handy later on. Make sure to
draw your lines very lightly
until you get to the final draft
so that the guidelines are easy
to erase later on.
|
|
Step
2:
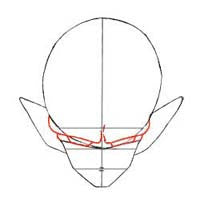
Next,
sketch in the eye, nose and mouth
(drawn in red) levels, and add
the ears. Make sure that the nose
and mouth lines are very close
together.
|
|
Step
3:
Erase some
of the unnecessary guidelines and
start filling in the details of
the face. The pupils of his eyes
are so small that, unlike most
anime characters, they don't have
any light glares or shiny parts.
Start the nose almost directly
below the eyes. Also remember not
to draw in the entire nose,
because when you see a character
straight on, most of the time
you'll only see its shadow. The
mouth is almost directly below
the nose; keep it small, for now.
It shouldn't be too much wider
than the nose. Also, draw his
neck and the details in his ears.
His neck is rather thick, and
should be directly below his
ears.
|
|

Step
4:
Add extra
shading under his eyes and mouth.
Draw in his clothing and
turban/hat thing (I'm not sure
what its called...^_^). Try to
make the fabric look like it
overlaps and folds so that it
doesn't look like its just
plastered onto his
head.
|
|
Step
5:
Here is the
final picture, colored in Adobe
Photoshop. You may wish to use
different mediums, though; I know
that a lot of people prefer
traditional mediums, so click
here
for a pencil version. Whichever
medium you choose, make sure you
properly shade your
picture.
|
|
3/4
View
Step
1:
Next I'm
going to go over how to draw
Piccolo's face from a 3/4 angle,
and without the turban/hat. ^_^
There are less steps for this
one, because I personally think
its easier than the front view.
Start off with a large circle
(the head is not so egg shaped
without the turban/hat), and draw
in the guidelines as shown. Note
that there are less guidelines
than in the first drawing; I just
omitted the very top line because
it is unnecesary. Make sure the
top horizontal line (drawn in
red) is angled slightly, since
that is going to be the guideline
for the eyes. Go ahead and draw
the ears, as well.
|
|
Step
2:
Draw in the
eyes, eyebrows, nose and mouth.
This time, draw the outline of
the nose, not just the shadow.
The eyebrows should be thick
enough that the right one
overlaps the left. The pupils are
very small and lack any sort of
light glares. The mouth is
directly below the nose. Make
sure that all the features are
lined up along the central
guideline that runs from the top
of the head to the chin. Fill in
the detail on the ears, as
well.
|
|
Step
3:
Next,
gently erase the guidelines. Draw
the antennae, making them
relatively low on the head and
distanced wide apart. Add the
wrinkles under the eyes and
mouth. Draw the upper half
portion of his body; as with in
the previous picture, the neck
starts immediatly below the ears.
Clean up your finished sketch as
much as you can, and you're
almost done. ^_^
|
|

Step
4:
Here is the
finished version, colored in
Adobe Photoshop. Click
here
for a pencil version.
You can
make several variations on these
two poses, depending upon what
type of expression you would
like. Try different eye and mouth
sizes to express different
emotions.
|
RETURN
TO MAIN
|