|
|
Front View (Robot
Form)
Step
1:
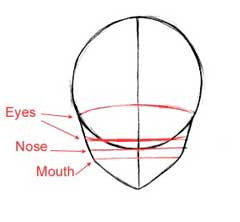
In this tutorial, I
will show you how to draw Tokiko Mima from
"Key: the Metal Idol", in both human and
robot form (since both were requested). I
will go over the robot form first. Begin
by drawing a large circle, then add the
lower half of her face. Her cheeks are
relatively high on her face, and her chin
comes to a point. Add the guidelines for
her eyes, nose, and mouth, as well as the
vertical line that will help you line up
her features. She has large eyes, so make
sure there is a lot of distance between
the two eye guidelines. The nose and
mouth, on the other hand, should be drawn
much closer together.
|
|
Step
2:
Once all the
guidelines have been placed, draw the
outlines of the eyes, nose and mouth. In
robot form, her expressive is generally
rather neutral, so don't make the tops or
bottoms of the eyes arch very much, and
make the mouth flat. Add her ears, as
well.
|
|
Step
3:
Next, draw the basic
shape of her hair. Do not add the details
yet, just worry about making the hair look
full and rounded without it being too
large. Draw her irises, which are large
ovals that do not fill up her entire eye.
To keep her expression neutral, make sure
her eyebrows are drawn levelly and don't
arch too much. Draw her neck, which should
be very thin.
|
|

Step 4:
Now, add the details
to her hair by drawing extra strands and
spikes. Add detail to her eyes; notice the
outline of her iris is very thick. Draw
the rest of her shoulders, as well as her
clothes. Notice that her clothes do not
have that many folds in them, which makes
your job a little easier. :) Erase all
unnecessary lines and clean up your
sketch.
|
|
Step
5:
Color or shade your
picture as you see fit. The coloring of
her hair and skin is very subdued, unlike
her human form, as you will see
below.
|
|
Front View (Human
Form)
Step
1:
Key's human form is
very similar to her robot form, except her
coloration is different and her face is
more expressive. Begin by drawing a large
circle, then add the lower half of her
face. Her cheeks are relatively high on
her face, and her chin comes to a point.
Add the guidelines for her eyes, nose, and
mouth, as well as the vertical line that
will help you line up her features. The
guidelines for the eyes should be curved
upwards slightly; this will make the eyes
look a little more expressive. She has
large eyes, so make sure there is a lot of
distance between the two eye guidelines.
The nose and mouth, on the other hand,
should be drawn much closer
together.
|
|
Step
2:
Once all the
guidelines have been placed, draw the
outlines of the eyes, nose and mouth. In
robot form, her expressive is generally
rather neutral, so don't make the tops or
bottoms of the eyes arch very much, and
make the mouth flat. Add her ears, as
well.
|
|
Step
3:
Characters with
spiky hair are difficult to draw because
of all the detail, so just draw the basic
shape of her hair. Don't worry about all
the details right now, just get the shape
right and try to make it nice and full.
Add her irises, which are large ovals and
should fill up most of her eye. Add her
eyebrows, and the shading under her mouth
and chin.
|
|

Step 4:
Now, add all the
detail to her hair, like all the extra
strands and spikes. The more detail, the
better. ^_^ Draw her shoulders and her
shirt. Add the light glares and pupils to
her eyes (all of which should be very
large, since she has such large,
expressive eyes). Also add detail to the
ears. Erase all unnecessary lines and
clean up your final sketch.
|
|
Step
5:
Color or shade your
picture however you like. In this picture,
the light source is behind her, which made
the hair difficult to shade since the
picture I was working from didn't show all
of her head. ^_^ You don't have to shade
it using this light source; wherever you
choose to put the shadows, though, make
sure the light source is consistent. For
example, if the light seems to be coming
from the left when you shade her hair, it
should also appear to be coming from the
left on her clothing and face.
|
|
3/4 View (Human
Form)
Step
1:
Next, we will move
on to a 3/4 view pose. Start with a large
circle, and draw the lower half of the
face. Make sure the cheek on the left side
of the face bulges out slightly. Divide
the face up with guidelines as shown. Make
sure the guidelines for the eyes curve
upwards, while the guidelines for the nose
and mouth curve slightly downwards. Do not
exaggerate this too much, though, or the
proportions will be off.
|
|
Step
2:
Draw the outline of
her eyes, as well as her nose, mouth, and
ear. The nose should be a pointy wedge,
and the mouth should be very small. Keep
the eyes a little over one eye length
apart, and make sure they follow the
curved guidelines.
|
|
Step
3:
Erase the guidelines
once you've gotten all the features placed
correctly. Draw the basic shape of the
hair, making it full and rounded without
being too large. Don't worry about the
details right now; you can add those after
you have established the basic form of the
hair. Add her irises, which will take up
most of her eye, as well as her eyebrows.
Shade beneath her chin, mouth, and on the
side of her nose.
|
|

Step 4:
Add the detail to
her hair by adding extra strands. Draw the
light glares and pupils on her eyes, and
add detail to her ears. If you like, add
the little marks on her cheeks; they are
quite common, and add a nice touch to the
picture. Draw her clothes, as well. They
don't have much detail or folds in these
pictures, so that's one less thing you
have to worry about. :) Make sure you
erase all the unnecessary lines before
moving onto the final step.
|
|
Step
5:
Color or shade your
picture however you like. When shading the
hair, make the highlights overlap the
shadows so her hair looks more
shiny.
|
RETURN
TO MAIN
|