|
|
Front
View
Step
1:
In this tutorial, I
will show you how to draw Iria, the bounty
hunter from "Iria: Zeiram the Animation."
She's a favorite character of mine, so I
was excited to get to work on a tutorial
of her (even if some of the pictures
didn't turn out as I had hoped...) ^_^
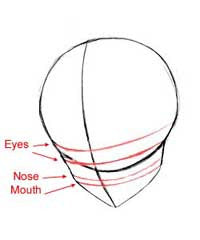
Anyway, begin by
drawing a large circle for the main part
of the head. Draw the lower half of the
face, which you should keep small, since
she has a small face. The curves on the
face should be subtle, except for the chin
(which almost comes to a point here). Draw
the different guidelines for the features,
which are all labeled in the picture to
the right. Don't forget to draw the
vertical guideline that runs from the
forehead to the chin; this will help you
line up all the features.
|
|
Step
2:
Once all your
guidelines have been placed, you can begin
filling in the actual features. Draw the
outlines of the eyes (which will be
contained within the two eye guidelines).
They should be flat ovals in shape, a
little over one eye length apart. Also,
make sure that the left eye is a little
smaller than the right. In a 3/4 view, the
eye closest to you should always be be
drawn slightly larger and rounder. The
nose, for now, is just a little mark on
the face. The rest of it will be defined
later on with shading. Keep the mouth
small; it shouldn't be drawn past the
right eye. Add the neck and ears, as
well.
|
|
Step
3:
Next, erase some of
the unnecessary guidelines and sketch in
the basic shape of the hair. Characters
with overly spiky, messy hair can be
difficult to draw, so just worry about
getting the shape of the hair right now,
and add the details and the extra spikes
later on. If you focus on the shape of the
hair and making it look nice and full,
rather than focusing on all the detail at
first, the hair will probably turn out
much better. Iria is one of the few anime
characters with more defined lips (most
just have a plain line for a mouth), so
adjust the mouth a little so it looks like
she has lips rather than a flat mouth. Do
this by making a slight indentation on the
top mouth, like in the picture. Add the
shading under her mouth and on the side of
her nose. As I mentioned before, it is
mainly the shading that will determine the
shape of the nose; don't make the line too
dark. Draw her eyebrows (which are
relatively thick), and draw the outline of
her irises (they should be almost perfect
circles, except for the area covered up by
her eyelids). Draw the mole under her
right eye, too.
|
|

Step 4:
Erase all remaining
guidlines. Add details to your sketch,
like the extra strands of the hair, the
hair beads, and her armor. Notice that one
side of her hair is spiky and sticks out
to the side, while the other side is
flatter; if you draw her facing to the
right, her hair will be covering up part
of her face, as shown in the final
tutorial of this section. Fill in the
detail of her eyes by adding the light
glares and pupils. Erase any unncessary
lines, and smooth over your sketch as best
as you can.
|
|
Step
5:
Next, color or shade
your picture however you like. I chose to
use Adobe Photoshop, but you can use any
medium. Notice that the strands of hair
are further defined by long streaks of
alternating highlights and shadows,
especially on the right side of the face.
Make sure you color her hair beads
different shades of tan, blue, black, and
red-orange, since the strands of beads
consist of different colors.
|
|
Profile
View
Step
1:
Next, we'll move on
to a more difficult angle, the profile.
Begin by drawing a large circle for the
top half of the face. The lower half is a
little trickier; try not to make it stick
out from her face too much, because her
face (as I mentioned before) isn't all
that big. Draw the slanted vertical
guidelines as shown to help you position
the eyes, and get the proper proportions
for the front part of the face. Draw the
horizontal lines to help you position her
eyes and mouth. Notice how high her mouth
will be on the face.
|
|
Step
2:
This is one of the
toughest steps, so be very careful. Draw
the nose and mouth, making sure to stay
within the guidelines. The lower lip is
slightly farther back on the face, and the
chin curves and sticks out slightly. Don't
make the nose too thin or pointy. It may
take some practice to get the curves and
angles just right. Draw in the outline of
the eye and ear, as well. Notice that the
eye is very slanted and
angular.
|
|
Step
3:
Now that all the
features have been positioned, you can
erase all your guidelines. Draw the basic
outline of the hair, focusing on the shape
rather than the details at this point. Add
the iris and eyebrow.
|
|

Step 4:
Fill in the details
on the hair by adding extra strands and
spikes to the existing forms. You will
notice again that her hair is much spikier
on one side than on the other. Draw the
strands of hair beads that hang down
behind her ears. Notice that they should
bend easily at the joints if draped over
her shoulder or blowing in the wind or
whatever; they aren't solid strands. Add
detail to her eyes, and draw the mole
directly beneath her eye. Draw her armor,
as well. Erase all unnecessary lines, and
clean up any messy areas until you are
ready to complete your picture.
|
|
Step
5:
I wanted to do
another 3/4 pose facing in the other
direction, to show that her hair will
partially cover her face when she turns
the other way, and because I wasn't very
pleased with the previous two tutorials
(though this one isn't much better...)
^_^; Begin with a large circle, as always,
and draw the lower half of the face. Make
the guidelines as shown (note that you can
just make a little mark for the nose
beneath the point where the vertical
guideline and bottom of the circle
intersect). The eyes aren't overly large,
so make the guidelines relatively close
together (not too close, though, or it'll
look like she's squinting or has really
beady eyes).
|
|
3/4
View (Facing the
other way)
Step
1:
I wanted to do
another 3/4 pose facing in the other
direction, to show that her hair will
partially cover her face when she turns
the other way, and because I wasn't very
pleased with the previous two tutorials
(though this one isn't much better...)
^_^; Begin with a large circle, as always,
and draw the lower half of the face. Make
the guidelines as shown (note that you can
just make a little mark for the nose
beneath the point where the vertical
guideline and bottom of the circle
intersect). The eyes aren't overly large,
so make the guidelines relatively close
together (not too close, though, or it'll
look like she's squinting or has really
beady eyes).
|
|
Step
2:
Using your
guidelines, draw the outline of the eyes,
nose, and mouth. The eyes should be spaced
a little over one eye length apart. The
nose will be just a small mark on the face
for now, since the shading will determine
its form rather than harsh
lines.
|
|
Step
3:
Erase the
guidelines. Draw the basic outline of the
hair, focusing on making the shape of it
look nice and full rather than worrying
about the smaller details. Draw her irises
and eyebrows, as well as the shading on
the side of her nose and under her
mouth.
|
|

Step 4:
Fill in the details
on her hair. Notice that the left part of
her hair obscures part of her face, and
that you cannot see her hair beads at this
angle. Any time she is facing the right,
the hair beads will probably be blocked
from view, and part of her face will be
covered, depending on how far her face is
turned. Add the light glares and pupils to
her eyes, and draw her clothes. In this
picture, she is wearing her cloak over her
usual armor. Do not draw in all the folds
yet; add them when shading. Erase all
unnecessary lines and clean up your
sketch.
|
|
Step
5:
Add shading to your
picture using whatever medium you like.
Notice that her nose, hair, and clothing
and defined mainly by shadows and
highlights rather than harsh lines. Try to
shade her hair so that you can see the two
different main parts (the spiky part on
the left side of her face and the flat,
smooth part on the right side of her face)
as separate, intersecting regoins. See how
the shading makes some parts look like
they are further forward than other
portions? Look at the other pictures of
her, and try to visualize how her hair
would look when she turns in different
angles. I hope that made some sense...
^.^
|
RETURN
TO MAIN
|